Let’s make automatic doors to the chicken coop
In the previous article, I described how simple it is to use a 12V electric actuator with radio remote control and gave examples of how to use it in practice. I hope you’ve found out that “the devil is not so scary as he is painted” because it is, in fact, a very simple layout.
I also promised that in the next post I will write a few words about how to make an automatic chicken coop door that will open and close at a certain time. If we were to insist on it, the system from the previous entry could be used as a system to control the door of the chicken coop. That solution, however, would need your daily interaction – each time you would have to use the remote control to open or close the door. Simply put, you would have to remember to release the hens in the morning each time and lock them there when they return in the evening.
But it is good to make life easier sometimes! Therefore, introduce a little automation very easily. Use an electric actuator and timer!
Where can it be applied?
Of course, such a system can be used in a chicken coop ? But it can be used wherever something needs to open and close or move, at a specific time, for example:
- Basic solar-tracking (increases the efficiency of obtaining solar energy by approx. 25%) – the actuator at 12:00 moves the panel from the south-east to the south-west, after the sun goes down (e.g. at 23:59) it moves the panel back to the south-east.
- Enabling entry to the garage or the property at certain times – the actuator raises and lowers the gate.
- Increase the exposure of your banner ad – for example, if your banner is standing by the road, make it turn in the direction from that drivers are going to work in the morning, and in the afternoon, turn it in the direction from which they will return home.
- Road signs – if they are to be visible at certain times – may change or be completely hidden.
- The car park entry barrier can be raised and lowered at a specified time with a simple actuator.
… And of course, there are many other uses – our imagination is the only limit!! :)
What is needed to implement the project?
- 12 or 24V electric actuator (e.g. such)
- relay with a 230V powered coil having double NC-COM-NO contacts (i.e. DPDT relay – two-circuit with a changeover contact)
- 12 or 24V power supply – voltage the same as the selected electric actuator (power supplies are available here)
- The simplest programmable timer. They are available in most stores – even one for PLN 20 is enough :)
- Cables – two-wire will be perfect.
Making the monster – or how to assemble an electrical system :)
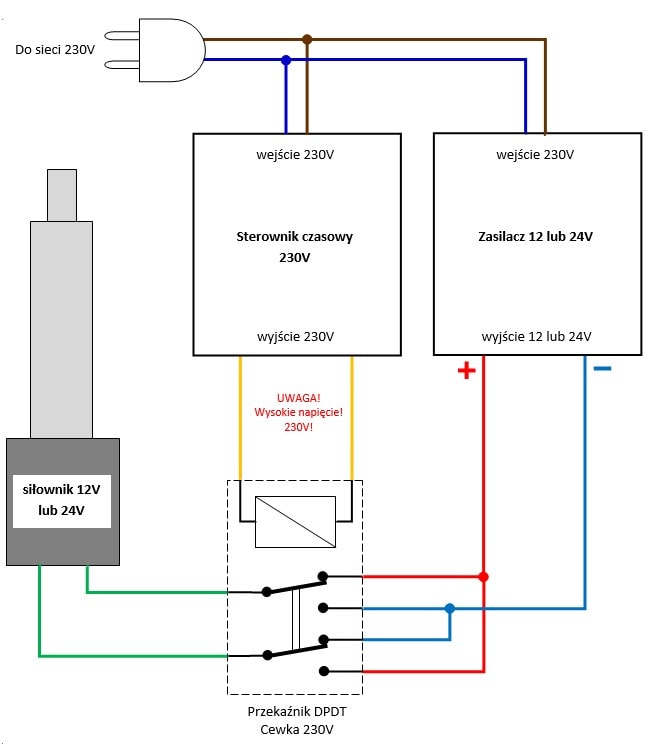
Look at the diagram below – nothing complicated :)
The idea behind the system is very simple. The heart of the system is a timer that turns on or off the 230V mains voltage at its output.
The relay coil is energized from the timer output. The relay turns on or off depending on the signal from our timer.
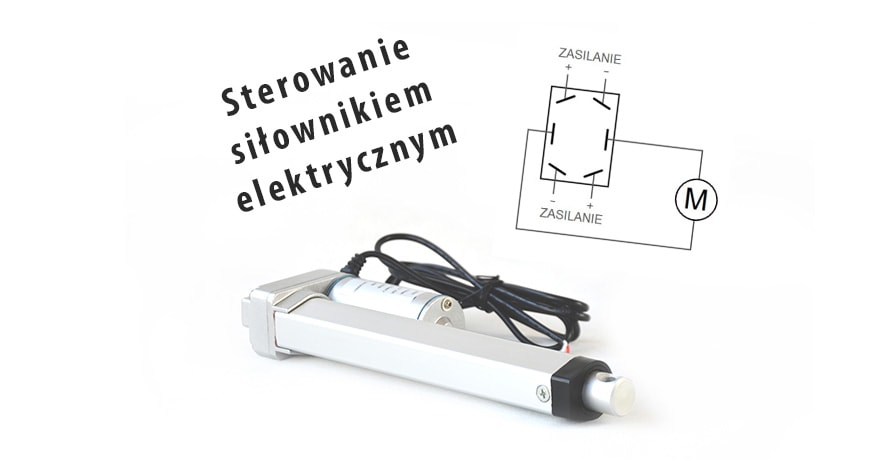
The relay output contacts are connected so that they work as the so-called “H-bridge” (why is it called that and how it works, and why it is our “favorite” design :) – you can read about it in the article).
An actuator is connected to the output of the said “H-bridge”. The H-bridge connects to the actuator low voltage from the power supply (12 or 24V) and by changing its polarity, it enables the actuator piston to extend or retract and in fact, to open or close the chicken coop door.
Of course, the circuit shown in the figure does not disconnect the power from the actuator. When the door opens or closes completely, the so-called “Limit switches” make it turn itself off. I once wrote a short article about the actuator structure and its operation if you want, take a look. Thanks to it, you will understand how it works.
Isn’t it simple?
Of course, when assembling the system (it is always worth doing it “on the table” first). Be careful not to accidentally cause a short circuit. The system will have parts connected to the 230V mains voltage! Therefore, be very careful when assembling and starting it.
When everything works “on the table”, it’s time for mechanical installation… :)
Mechanical installation – I will give you a simple lifehack :)
You’ve gone through the electrics and everything is already working – bravo! But this is still not the full success ? The actuator must be attached to the door.
Option 1: as standard – like for the gate wing.
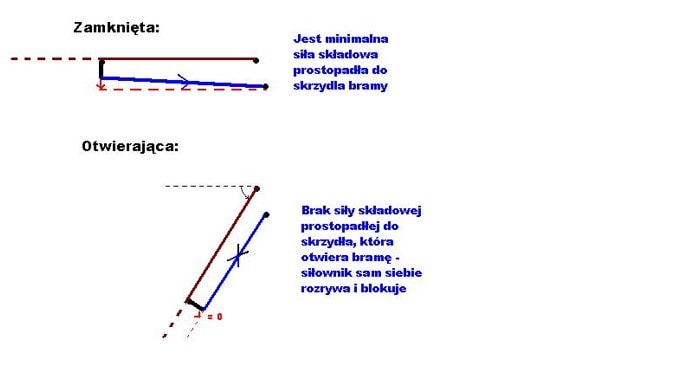
So, you need to make holders for the actuator: one on the door, and the other on the frame or wall at the hinges. Mount the actuator on the holders, remembering the principle shown in the figure below: the actuator MUST NOT be parallel to the flat door in any position, it must always be at an angle to it.
With such an installation, the length of the actuator must be carefully selected. Take a look at some of the information in this artikle, that may be very useful for you. However, if you do not know how to choose the cylinder extension length, contact us – we will be happy to help :)
Option 2: I promised a lifehack – here it is!
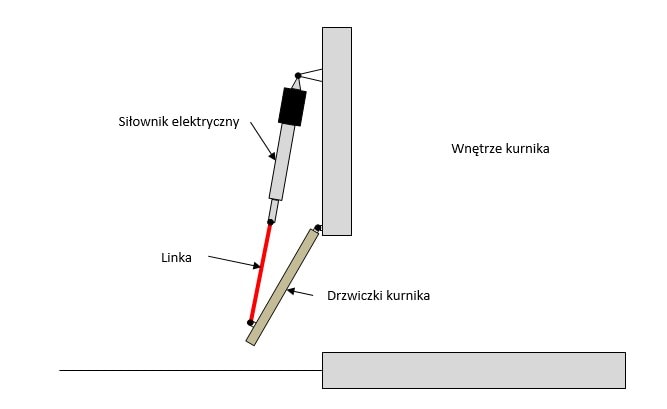
To open an upwards lifted door use… A rope! ? Such a solution will have at least three serious advantages:
- it’s MEGA simple,
- it’s MEGA safe for your inventory,
- and it is MEGA easy to open such a door manually in case of power failure :)
What is it about? The principle of operation is explained in the figure below:
Why is it simple? Because you don’t have to plan very carefully the points at which the actuator must be attached to the door and the frame. The length of the actuator extension is also losing its importance, i.e. it is not completely irrelevant, but this significance is very decreased because with the point of attachment of the rope on the door you can adjust the required stroke of the actuator.
Why safe? Due to the lack of a rigid actuator-door-frame connection, the actuator will not crush the poor chicken that could accidentally be in the door’s light when closing it. In this case, the rope will loosen and the chicken will feel only the weight of the door itself. Unless it is made of a tank hatch, the chicken will surely survive this clash ? Even if the door really would be a “tank hatch”, supporting air springs (the same as in car trunks) can always be used – then the chick will also live another day ?
Why is it easy to open the door without electricity? Because you only need to pull the rope with your hand, and then attach the rope to a hook to keep it open :)
If you were fancy and willing – how can you modify the layout?
The fact that the system was supposed to be simple does not mean that it cannot be modified in any way. It can and will remain as simple as that! :)
One of our friends told us that instead of a timer, you can use a dusk sensor – such as the one that turns on the lighting in the garden. Apparently, chickens do not have a built-in clock and do not watch the time, but are guided by the brightness of the sunlight during the day.
We do not know much about poultry, but we trust people who are specialists in this subject and tell us such things ?
So replace the “time trial” with a “twilight sensor”! You won’t even have to program the opening and closing hours – just adjust the sensitivity potentiometer of the twilight sensor – child’s play, right? :)
Automatic door to the chicken coop – Summary.
I promised it would be easy, and I hope you don’t feel disappointed ?
Finally, I will only mention safety. Make sure to equip the system with some kind of overload switch.
At its simplest, it can be a common fuse in series with the actuator. It should be picked so that when the actuator encounters any excessive resistance, the fuse will blow and immediately shut down the actuator.
We would like every chicken to feel safe! ?
And quite seriously, if you want to use such a system with an electric actuator in a chicken coop or use it for another purpose – always remember about safety!
And in the next part – the promised “H-bridge” :)
 biuro@elektrobim.pl
 91 817 14 69


